What is an AI agent? In our case, it's a program that uses a large language model (LLM) to generate instructions for the robot. The LLM takes in text input and generates a list of API calls that the robot should make to accomplish a task.
Stretch AI contains the tools to talk to your robot and have it perform tasks like exploration, mapping, and pick-and-place. In this document, we'll walk through how it works and how to test out different components of the system.
Click to follow the link to YouTube:
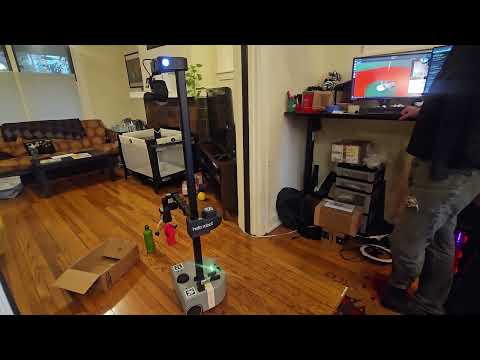
Above: example of the AI agent being used with the voice command and the open-source Qwen2.5 LLM. The specific commands used in the video are:
python -m stretch.app.ai_pickup --use_llm --use_voice
You can also run individual components:
# AI agent chat only
python -m stretch.app.chat --prompt pickup

# Exploration and mapping
python -m stretch.app.mapping

# Grasping objects
python -m stretch.app.grasp_object --target_object "stuffed toy leopard"
For more details see the following sections:
- Running the AI Agent
- Agent Architecture - for how to modify it
- Testing Individual Components
- Mapping and Exploration - testing the robot's ability to explore and map the environment
- Grasping - testing the robot's ability to pick up objects
- Chat - testing the AI agent chat functionality
- Common Issues - for debugging common problems
Stretch AI also has a set of apps, which are standalone programs you can execute on your robot. Several of these are described in Testing Individual Components below, in addition to in the apps documentation.
The entry point to the AI demo is the ai_pickup script:
python -m stretch.app.ai_pickupWhen you run the ai_pickup demo, Stretch will attempt to pick up an object from the floor and place it inside a nearby receptacle on the floor. You will use words to describe the object and the receptacle that you'd like Stretch to use.
While attempting to perform this task, Stretch will speak to tell you what it is doing. So, it is a good idea to make sure that you have the speaker volume up on your robot. Both the physical knob on Stretch's head and the volume settings on Stretch's computer should be set so that you can hear what Stretch says.
Now, on your GPU computer, run the following commands in the Docker container that you started with the script above.
You need to let the GPU computer know the IP address (#.#.#.#) for your Stretch robot, which can be done with the following command (only needed once):
./scripts/set_robot_ip.sh #.#.#.#Please note that it's important that your GPU computer and your Stretch robot be able to communicate via the following ports 4401, 4402, 4403, and 4404. If you're using a firewall, you'll need to open these ports.
Next, run the application on your GPU computer:
It will first spend time downloading various models that it depends on. Once the program starts, you will see a Rerun GUI that looks like the one below.

Then, in the terminal, it will ask you to specify an object and a receptacle. For example, in the example pictured below, the user provided the following descriptions for the object and the receptacle.
Enter the target object: brown moose toy
Enter the target receptacle: white laundry basket 
At Hello Robot, people have successfully commanded the robot to pick up a variety of objects from the floor and place them in nearby containers, such as baskets and boxes.
When you run the ai_pickup command, it will create a Pickup Executor object, which parses instructions from either an LLM or from a handful of templates and uses them to create a reactive task plan for the robot to execute. When you use this with the --use_llm flag -- which is recommended -- it will instantiate one of a number of LLM clients to generate the instructions. The LLM clients are defined in the llm_agent.py file and are:
qwen25and variants: the Qwen2.5 model from Tencent; a permissively-licensed model. The default isqwen25-3B-Instruct.openai: the OpenAI GPT-4o-mini model; a proprietary model accessed through the OpenAI API.gemma2b: the Gemma2b model from Google, accessed via Hugging Face's model hub.
We recommend qwen25-3B-Instruct or gemma2b if running locally on a powerful machine (e.g. a computer with an NVIDIA 4090 or similar), and openai if you have access to the OpenAI API.
For example if you want to test with Gemma 2b, you can run:
python -m stretch.app.ai_pickup --use_llm --llm gemma2bYou can also run many of the components individually, as explained below:
- Mapping and Exploration of the environment
- Grasping objects from the floor
- Chat with a large language model
To use an OpenAI model for generating the instructions, first create an OpenAI API KEY by following the OpenAI quickstart instructions. Then, set the OPENAI_API_KEY environment variable to your API key. You can do this by adding the following line to your ~/.bashrc or ~/.bash_profile file:
export OPENAI_API_KEY="your_api_key_here"Then, restart your terminal or run source ~/.bashrc or source ~/.bash_profile to apply the changes.
You can specify that you want to use the OpenAI model by passing the --llm openai flag to the ai_pickup command:
python -m stretch.app.ai_pickup --use_llm --llm openaiYou can use an LLM to provide free-form text input to the pick and place demo with the --use_llm command line argument.
Running the following command will first download an open LLM model. Currently, the default model is Qwen2.5-3B-Instruct. Running this command downloads ~10GB of data. Using an ethernet cable instead of Wifi is recommended.
python -m stretch.app.ai_pickup --use_llmOnce it's ready, you should see the prompt You: after which you can write your text request. Pressing the Enter key on your keyboard will provide your request to the robot.
For example, the following requests have been successful for other users.
You: pick up the toy chicken and put it in the white laundry basket
You: Find a toy chicken
Currently, the prompt used by the LLM encourages the robot to both pick and place, so you may find that a primitive request results in the full demonstration task.
You can find the prompt used by the LLM at the following location. When running the ai_pickup demo, you can modify this file to see how it changes the robot's behavior:
./../src/stretch/llms/prompts/pickup_prompt.py
The entry point into the LLM Agent is the ai_pickup.py file. This file creates an instance of the PickupExecutor class, which is responsible for parsing the instructions from the LLM and creating a task plan for the robot to execute.
In addition, if you run it with the --use_llm flag, it creates a chat wrapper:
if use_llm:
    llm_client = get_llm_client(llm, prompt=prompt)
        chat_wrapper = LLMChatWrapper(llm_client, prompt=prompt, voice=use_voice)
This will create an LLM client (for example, the OpenAI client), and provide it a prompt. The prompt used in the LLM Agent demo is the pickup_prompt.py.
Take a look at how the prompt starts out:
You are a friendly, helpful robot named Stretch. You are always helpful, and answer questions concisely. You will never harm a human or suggest harm.
When prompted, you will respond using these actions:
- pickup(object_name) # object_name is the name of the object to pick up
- explore(int) # explore the environment for a certain number of steps
- place(location_name) # location_name is the name of the receptacle to place object in
- say(text) # say something to the user
- wave() # wave at a person
- nod_head() # nod your head
- shake_head() # shake your head
- avert_gaze() # avert your gaze
- find(object_name) # find the object or location by exploring
- go_home() # navigate back to where you started
- quit() # end the conversation
This lists the different functions that the LLM agent can use to interact with the world. If you wanted to add your own functions to this list, you would start by adding them here. You would then add them to the parse_command function in the PickupPrompt class, and add the appropriate logic handling the function call to the PickupExecutor class.
The agent code uses two additional abstractions, Operations and Tasks, to manage the robot's behavior. These are:
- An Operation is a single, useful component: it's the basic API that the agent calls to interact with the world most of the time. An example is the GraspObjectOperation, which defines how the robot should grasp an object.
- A Task is a simple finite state machine which defines how a set of operations. An example is the PickupTask, which defines how the robot should pick up an object and place it in a receptacle by searching for both the object and the receptacle, grasping the object, and placing it in the receptacle.

Mapping is a key component of the robot's ability to navigate and interact with the world.
You can test the mapping capabilities of the robot by running the following command:
python -m stretch.app.mappingThis will start the robot in a mapping mode, where it will explore the environment and build a map of the room. You should be able to see this map in Rerun.
You can run this command with the --explore-iter flag to set the number of iterations the robot should explore for:
python -m stretch.app.mapping --explore-iter 10And if you do not like the robot spending time talking to you, run it with the silent flag:
python -m stretch.app.mapping --silentThe AI demo operates on detected images of objects, like these:
| Object Image | Receptacle Image |
|---|---|
 |
 |
You may want to test the robot's grasping capabilities by running the following command:
python -m stretch.app.grasp_object --target_object "stuffed toy leopard"This will have the robot attempt to grasp the object described in the --target_object argument.
Click to follow the link to YouTube:
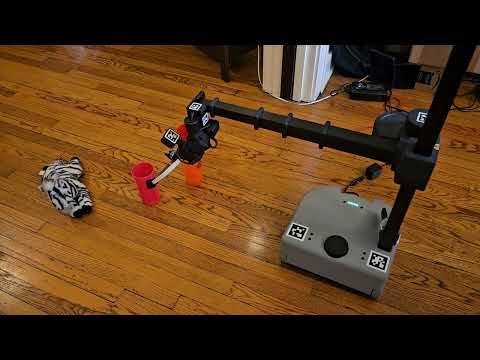
To test the grasping app, place an object directly in front of the robot, and run the command. The robot should attempt to grasp the object, pick it up, and release it. You can see an example of this in the video above, where multiple cups are placed in front of the robot, and it successfully picks up the pink one. The command given was:
python -m stretch.app.grasp_object --target_object "pink plastic cup"Grasping is implemented in the GraspObjectOperation class. This class has a lot of options, available via the configure() function. Some to note:
talk: bool- whether the robot should speak out loud while performing the task (if false, the robot will stay quiet)match_method- eitherfeatureorclass; iffeature, the robot will attempt to match the object to a feature vector, and ifclass, the robot will attempt to match the object to a class label.target_object: str- the name of the object to grasp. Must be a class label ifmatch_methodisclass.servo_to_grasp: bool- if it should use visual servoing to grasp. If false, will grasp open-loop based on past head observations, which relies on good hand-eye calibration, a well-calibrated head, and accurate base pose estimates. True is strongly recommended.show_servo_gui: bool- if it should show the visual servoing GUI. This is useful for debugging; if you are having trouble with grasping, you may want to set this toTrueto see what the robot is seeing. Can cause issues if OpenCV is not installed properly - see Common Issues below.
Click to follow the link to YouTube:
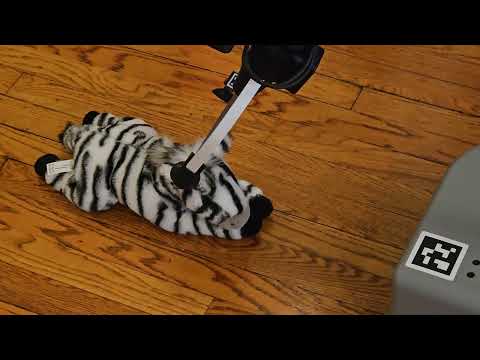
Other parameters will configure how visual servoing operates and how close the robot needs to get to the object before closing the gripper; to understand these, it's best to look at the GraspObjectOperation source code.
Click to follow the link to YouTube:
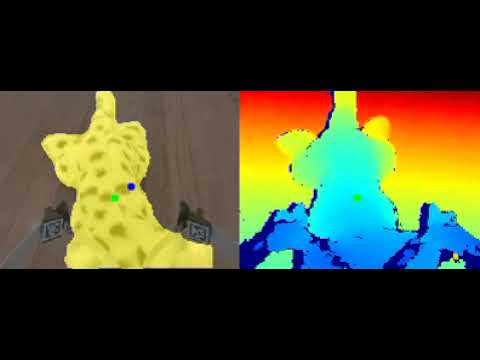
This GUI will only appear when using the grasp_object app directly. It shows the robot's view of the object complete with mask on the left, and the depth image on the right. The blue and green dots show the grasp center and the center of the object mask.
You can chat with the robot using LLMs by running the following command:
python -m stretch.app.chatYou can run this command with the --llm flag to set a specific backend:
python -m stretch.app.chat --llm qwen25This returns something like:
(stretch_ai) cpaxton@olympia:~/../src/stretchpy$ python -m stretch.app.chat --llm qwen25
Loading checkpoint shards: 100%|█████████████████████████████████████████████████████████████████████████████| 2/2 [00:00<00:00,4.61it/s]
You: hello who are you
Response: Hello! I'm Stretch, a friendly and helpful robot from California. How can I assist you today?
--------------------------------------------------------------------------------
Time taken: 1.0482106080744416
--------------------------------------------------------------------------------
You: What can you do?
Response: I can find objects in a house, pick them up, wave at people, answer questions, follow simple sequences of commands, move around the house, and follow people.
--------------------------------------------------------------------------------
Time taken: 0.4540962891187519
--------------------------------------------------------------------------------
Alternately, if you run it with the Pickup prompt from the AI demo:
python -m stretch.app.chat --llm qwen25 --prompt pickupYou can see that it returns a list of API calls:
You: Hello! who are you?
Response: [('say', '"Hello! My name is Stretch. I am here to help you with any tasks you need."')]
Finally, you can run it with the --voice flag to test audio input, e.g.:
python -m stretch.app.chat --voicePress enter to speak. The robot will respond to your voice input, processed using OpenAI Whisper.
If you want the robot to speak back, you can enable this with the --talk flag:
python -m stretch.app.chat --voice --talkAnd optionally specify the IP address of the robot:
python -m stretch.app.chat --voice --talk --robot_ip 192.168.1.69The robot uses a motion planner to avoid obstacles on its feature-rich 3D map of the environment. If you are having trouble, you may want to tune the config file until it works. Some advice below.
You can find the motion planning block in the config file:
motion_planner:
  step_size: 0.05
  rotation_step_size: 0.1
  algorithm: "a_star"  # ["rrt", "rrt_connect", "a_star"]
  simplify_plans: False
  shortcut_plans: False
  simplify:
    max_step: 0.5
    min_step: 0.05
    num_steps: 8
    min_angle: 0.1
  shortcut_iter: 100
What these do:
step_sizeis how far the robot moves in each step -- together with therotation_step_size, this determines how granular collision checking will berotation_step_sizeis how far the robot rotates in each step -- together, these are used to determine how the robot movesalgorithmis the algorithm used to plan the robot's path --rrt_connectworks fairly wellsimplify_plansandshortcut_plansare used to simplify the robot's path -- these can be useful if the robot is taking too long to get places, and are intended to be used with thesimplifyandshortcut_iterparameters and therrt_connectalgorithm
If you want to try a_star, you can set algorithm to a_star. This is a simpler algorithm that may work better in some cases. You may want to disable simplify_plans and shortcut_plans if you are using a_star.
An alternate configuration file for A star is available. You can use this by running the following command:
python -m stretch.app.mapping --explore-iter 15 --parameter-file a_star_planner.yaml
Sometimes, the head camera is not well aligned, or is poorly calibrated. This can cause issues with the robot's ability to navigate, and results in large swathes of the robot's map appearing as red obstacles. You can see an example of this in the image above.
Most often, this happens because the head is not where the robot thinks it is, which can be challenging to fix.
If you are seeing areas marked as red obstacles for no reason, then try changing the following parameters in the config file, especially obs_min_height:
obs_min_height: 0.10  # Ignore things less than this high when planning motions
obs_max_height: 1.8  # Ignore things over this height (eg ceilings)
neg_obs_height: -0.05  # Things less than this height ARE obstacles
use_negative_obstacles: True  # Use the negative height as an obstacle
obs_min_density: 10  # This many points makes it an obstacle
min_points_per_voxel: 15  # Drop things below this density per voxel
Obstacles below this height will be ignored, and obstacles above this height and below obs_max_height will be considered obstacles. If you are seeing too many obstacles, you may want to increase obs_min_height to ignore more of them.
In addition, if your floor has lots of reflections or gaps, neg_obs_height can sometimes cause issues. It creates obstacles if there are opoints detected below this height. If you are seeing too many obstacles, you may want to set use_negative_obstacles to False, or change neg_obs_height to a lower (more negative) value.
The grasp_object app will try to display what the robot is seeing using opencv python, particularly the imshow method. This may cause issues if your OpenCV installation has trouble, or if you're running on a headless computer.
You can use the reset app to have the robot move back to wherever you started the robot server from, without any further observations or obstacle avoidance:
python -m stretch.app.resetYou can also prepend a trial of ai_pickup with the --reset flag to accomplish the same:
python -m stretch.app.ai_pickup --reset <other flags>Be careful with this command, as it does not avoid obstacles! It's just a convenience function to move the robot back to a known starting position.
You can add the --robot_ip flag to the ai_pickup command to specify the robot's IP address. For example, if your robot's IP address is 192.168.1.69, you might run the following command:
python -m stretch.app.ai_pickup --robot_ip 192.168.1.69 --use-llm --llm openai --use-voiceAnd to move it back to (0, 0, 0):
python -m stretch.app.ai_pickup --reset --robot_ip 192.168.1.69 --use-llm --llm openai --use-voiceRun the view_images app to make sure images are streaming from the robot and it can move its arm:
python -m stretch.app.view_images

# Optionally set robot IP address
python -m stretch.app.view_images --robot_ip $ROBOT_IP
Then try running mapping with 0 iterations, so the robot just spins in place:
python -m stretch.app.mapping --explore-iter 0Then a larger map:
python -m stretch.app.mapping --explore-iter 10Then reset the robot, either manually or with the reset app:
python -m stretch.app.resetThen try running the grasp_object app with the --target_object flag set to an object in the robot's view, setting the objects up in front of the robot as described in the Grasping section above.
python -m stretch.app.grasp_object --target_object "stuffed toy leopard"Finally you can try AI pickup without an LLM:
python -m stretch.app.ai_pickupThen with an LLM:
python -m stretch.app.ai_pickup --use_llmThen with voiceE:
python -m stretch.app.ai_pickup --use_llm --use_voice